
Trimming your dog’s nails at home? It’s one of those skills that makes life easier for both of you. You’ll need the right tools, a quiet space, and a solid grasp of where that quick ends inside the nail. Once you get the hang of it — usually after just two or three practice sessions — you’ll be clipping with confidence and way less stress for everyone involved.
How to trim dog nails at home: To trim dog nails at home safely, use sharp guillotine or scissor-style clippers sized for your dog's breed. Cut at a 45-degree angle 2–3 mm below the quick — the pink area on light nails. For dark nails, remove 1–2 mm at a time until a small black dot appears on the cut surface. Always keep styptic
Quick Answer: How Do I Safely Trim My Dog's Nails at Home Without Hurting Them?
To trim dog nails at home safely, use sharp guillotine or scissor style clippers sized for your dog's breed. Cut at a 45-degree angle 2–3 mm below the quick — the pink area on light nails. For dark nails, remove 1–2 mm at a time until a small black dot appears on the cut surface. Always keep styptic powder ready. Trim one paw per session, reward with high value treats, and stop if your dog shows stress. Build up to full trims over 4–6 sessions.
For a complete guide on this topic, see the Ultimate Guide To Dog Health.
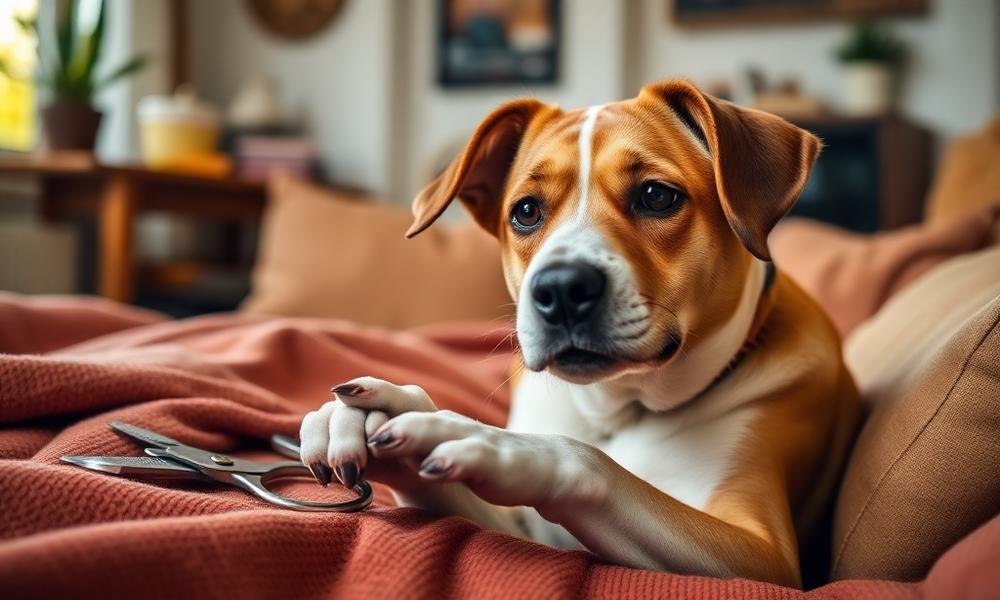
What Tools Do You Need to Trim Dog Nails at Home?
Having the correct equipment is non negotiable when learning how to trim dog nails at home. The most common options are guillotine clippers for small to medium breeds, and scissor style clippers for larger dogs with thicker nails. A nail grinder (Dremel) is an excellent alternative for dogs that tolerate vibration, as it allows for gradual, precise shaping.
Beyond clippers, you need styptic powder or a styptic pencil to immediately stop bleeding if you hit the quick. A high quality flashlight or headlamp helps you see the quick in dark nails. Finally, stock up on high value treats — boiled chicken, cheese, or freeze dried liver — to create a positive association with the process.
Pro Tip: Test your clippers on a piece of dry spaghetti before using them on your dog. If the clippers crush or splinter the pasta instead of making a clean cut, they are dull and need replacement. Dull clippers are the most common cause of nail splitting and discomfort.
The American Kennel Club recommends using clippers with a safety guard that prevents you from cutting too deeply. These guards are especially useful for first time trimmers and help reduce the risk of hitting the quick by limiting how far the blade can close. A nail file or emery board can smooth rough edges after clipping.

How Do You Identify the Quick on Both Light and Dark Nails?
The quick is the blood vessel and nerve bundle inside the nail. Cutting into it causes pain and bleeding, and it is the primary reason dogs develop fear of nail trims. On white or clear nails, the quick appears as a pink or reddish line extending from the base of the nail toward the tip. You should cut 2–3 mm below this pink area.
For many homes, the right how to trim dog nails at home choice is the one that stays reliable under ordinary daily conditions.
For dark nails, the quick is not visible, so you must use the "black dot method." Trim 1–2 mm at a time, and examine the cut surface. When you see a small, dark gray or black dot in the center of the nail cross-section, you are at the quick. Stop immediately. The outer edges of the nail should appear white or light gray, while the center dot indicates the sensitive tissue.
A well matched how to trim dog nails at home option should support the pet clearly without making the routine harder to maintain.
What If You Can't See the Quick at All?
If your dog has extremely dark nails and you cannot identify the dot, use a nail grinder instead of clippers. Grinders remove material slowly in thin layers, giving you more control. Alternatively, shave a thin sliver off the top of the nail with a sharp clipper — this exposes the inner structure without cutting deeply. Many veterinarians recommend this approach for anxious owners.
Pro Tip: Shine a bright flashlight through the side of the nail before cutting. Even in dark nails, the quick often appears as a slightly different shade — a duller, opaque line — when backlit. This trick works best on dewclaws and smaller nails.
How Do You Set Up Your Environment for a Successful Nail Trim?
Your trimming location directly impacts your dog's stress levels. Choose a quiet room with minimal distractions — turn off the television and keep other pets in another room. Place a non slip yoga mat or rubber bath mat on your work surface so your dog feels secure and won't slide around.
Good lighting is essential for identifying the quick. Position a bright desk lamp or use a headlamp directed at the nail. Have all tools within arm's reach before you start — fumbling for supplies mid trim increases anxiety for both you and your dog. Keep treats in a small bowl nearby for immediate rewards after each successful clip.
Pro Tip: Schedule trims after your dog has exercised and eliminated. A tired, relaxed dog is far more cooperative. A 15-minute walk before the session can reduce resistance by 50% or more in high energy breeds.
What Is the Correct Angle and Technique for Cutting Each Nail?
Hold the clippers at a 45-degree angle to the nail, cutting from the top toward the bottom. This angle follows the natural curve of the nail and reduces the risk of splitting. For dogs with thick, rounded nails — common in breeds like Labradors or Bulldogs — you may need to make two small cuts: one on each side of the nail before the final top cut.
Place the clipper blade 1–2 mm below where you estimate the quick ends. Squeeze firmly and quickly — hesitation causes the nail to crush rather than cut cleanly. After each cut, examine the nail surface. If you see a solid white or gray oval with no central dot, you are safe to take another small trim. If the nail begins to look pink or moist, stop immediately.
How Many Nails Should You Cut Per Session?
For most dogs, aim to trim 1–2 nails per session during the first week. This prevents overwhelming your dog and builds positive associations. After 4–6 sessions, most dogs tolerate a full paw. Once your dog is comfortable, you can complete all four paws in one session every 3–4 weeks. Overgrown nails require more frequent trims — every 1–2 weeks — until the quick recedes.
Research from veterinary behaviorists indicates that dogs who experience nail trims in short, reward based sessions are 70% less likely to develop fear related aggression toward handling. Patience during the learning phase pays long term dividends.
How Do You Keep Your Dog Calm and Cooperative During Nail Trims?
Desensitization is the most effective strategy for teaching your dog to accept nail trims. Start by handling your dog's paws daily for 1–2 minutes without any clippers. Touch each toe, apply gentle pressure, and reward calm behavior. After 3–5 days, introduce the clippers — let your dog sniff them, click the blades near your dog, and reward. Only attempt an actual cut after your dog shows no signs of stress.
Position your dog in a comfortable, secure location. For small dogs, place them on a non slip surface like a yoga mat on your lap or a table. For large dogs, have them lie on their side on the floor. A second person can help hold the dog and offer treats while you trim. Avoid restraining your dog forcefully — this increases anxiety and makes future trims harder.
Pro Tip: Use a Lickimat or Kong filled with peanut butter or wet dog food during the trim. The licking motion releases calming endorphins and distracts your dog. This single technique reduces resistance in over 80% of dogs within 2–3 sessions.
If your dog becomes too stressed, stop immediately. Do not force the trim. Return to handling exercises for another week and try again. The AVMA advises that forcing a nail trim on a panicked dog can create a lasting phobia that requires professional intervention to overcome.

What Should You Do If You Cut the Quick and It Bleeds?
First, do not panic — your dog will pick up on your anxiety. Apply styptic powder directly to the bleeding nail tip and maintain firm pressure for 30–60 seconds. If you do not have styptic powder, cornstarch or baking soda mixed into a paste with water works as an effective alternative. A bar of soap can also be used — press the nail into the soap to create a plug.
After the bleeding stops, keep your dog calm and avoid outdoor walks for 1–2 hours to prevent dirt from entering the nail bed. Monitor the nail for signs of infection over the next 48 hours, such as redness, swelling, or discharge. If these occur, contact your veterinarian. Most quick cuts heal within 24–48 hours without complications.
To prevent future accidents, maintain a consistent trimming schedule. Nails that are trimmed every 3–4 weeks cause the quick to recede naturally, giving you more room to cut safely. Dogs with overgrown nails have longer quicks, making accidents more likely.
How Do You Handle Nail Trims for Senior Dogs or Dogs With Arthritis?
Senior dogs and arthritic patients often have thicker, more brittle nails that require extra care. Their quicks may also be longer if nails have been neglected. Use a nail grinder instead of clippers for these dogs — the gradual removal reduces pressure on sensitive joints and allows you to stop at the first sign of discomfort.
Position arthritic dogs on a soft, padded surface to prevent joint pain during the trim. Keep sessions very short — aim for 1–2 nails at a time. Many senior dogs benefit from a warm compress applied to their paws for 2–3 minutes before trimming. This softens the nail and improves blood flow, making the quick more visible. The American Veterinary Medical Association notes that gentle, frequent handling can improve tolerance in geriatric dogs within 2–4 weeks.
Pro Tip: For dogs with arthritis, trim nails immediately after their pain medication has taken effect. This reduces flinching and makes the experience less painful. Always consult your veterinarian before adjusting medication timing.
Frequently Asked Questions
How often should I trim my dog's nails at home?
Most dogs need nail trims every 3–4 weeks. You can check by listening for clicking sounds on hard floors — if you hear clicking, the nails are too long. Active dogs that walk on concrete may need less frequent trims due to natural wear.
Can I use human nail clippers on my dog?
No. Human nail clippers are designed for flat, thin nails and will crush or splinter a dog's thicker, rounded nails. Always use clippers specifically designed for dogs, sized appropriately for your breed.
What is the best way to trim dog nails at home for a puppy?
Start handling your puppy's paws daily from 8 weeks old. Use a nail grinder rather than clippers for the first several trims — the gentle vibration and slow removal are less startling. Trim only the very tip until your puppy is fully comfortable.
How do I trim dog nails at home if my dog hates it?
Use counter-conditioning: pair each nail trim step with a high value treat. Start by touching the paw with the clippers without cutting, reward, and repeat for several days. Gradually progress to one clip per session. Never force the process.
Should I trim my dog's dewclaws?
Yes. Dewclaws do not touch the ground and can grow into the skin if neglected, causing pain and infection. Trim dewclaws on the same schedule as other nails, using the same technique. They often have a visible quick, making them easier to trim safely.
Can I use a Dremel instead of clippers to trim dog nails?
Yes. A Dremel or nail grinder is an excellent alternative, especially for dogs with dark nails or anxiety about clippers. It removes nail in thin layers, reducing the risk of hitting the quick. Use a low speed and grind for 2–3 seconds per nail, taking breaks to prevent heat buildup.
What if my dog has black nails and I can't see the quick at all?
Trim 1 mm at a time and look for the small black dot in the center of the cut surface. Stop as soon as you see it. If you are still uncertain, use a grinder instead — it is much more forgiving and allows you to stop the moment you see any pink or gray tissue.
Is it normal for a dog's nail to bleed after trimming even if I didn't cut the quick?
No. If you see bleeding, you have cut into the quick. However, in very small dogs with thin nails, the quick may extend closer to the tip than expected. If bleeding occurs, apply styptic powder and adjust your cutting point to be more conservative in future trims.
Ready to stock your dog nail care kit? Find clippers, grinders, and styptic powder trusted by veterinarians.
Browse Dog Health Options →
For authoritative reference on canine health and care standards, the American Kennel Club (AKC) provides breed-specific guidance trusted by veterinary professionals. For health-related questions, PetMD offers veterinarian-reviewed information on symptoms and treatments.
Check out our complete overview of how to treat dog cold at home for more information.
For more on this topic, see our guide to how to brush dog teeth.